How to NFT gate content on a WordPress site with Lit-gated plugin
 Paula Guilfoyle

Learn how to use the wordpress Lit gate plugin to token gate a webpage with an NFT
As an entrepreneurial non-developer, no code and low code solutions is a must for solving problems. As of late, I have had reason to search for and learn to use a few web3 plugins and low or no code solutions that will allow me to interact with blockchain while creating a Web3 WordPress site.
A web3 website is a website that uses web3 wallets for connection rather than a username or an email address. And with the growth of Low and No code solutions coming to the market, it’s now easy for a website to utilize web3 technology.
In search for a solution to gate a WordPress site with NFT’s I came across a Token/NFT/Blockchain Page gating plug in by Lit Protocol. What attracted me to this plugin over other plugins for gating was the number of compatible chains and you can use NFTs, Tokens and other conditions to gate the content on your site. Supported Blockchains | Lit Protocol Developer Docs
Lit Protocol is an open source, decentralized utility that uses encryption to provide blockchain users access to digital and real-world experiences
In this article, you will learn how to set up Lit Protocol on your WordPress site and gate content with an NFT.
Getting Started
To get started, you will need
Web3 Wallet (metamask is perfect)
You will need a web3 wallet to sign the conditions that allow for unlocking of the content.
2. Lit-gated plugin
You can download the plug in from Token / NFT / Blockchain Page Gating – WordPress plugin | WordPress.org. Its easy to find this from your WordPress Dashboard, just go to plugins, add new. And then search for new and search for Lit Gate.
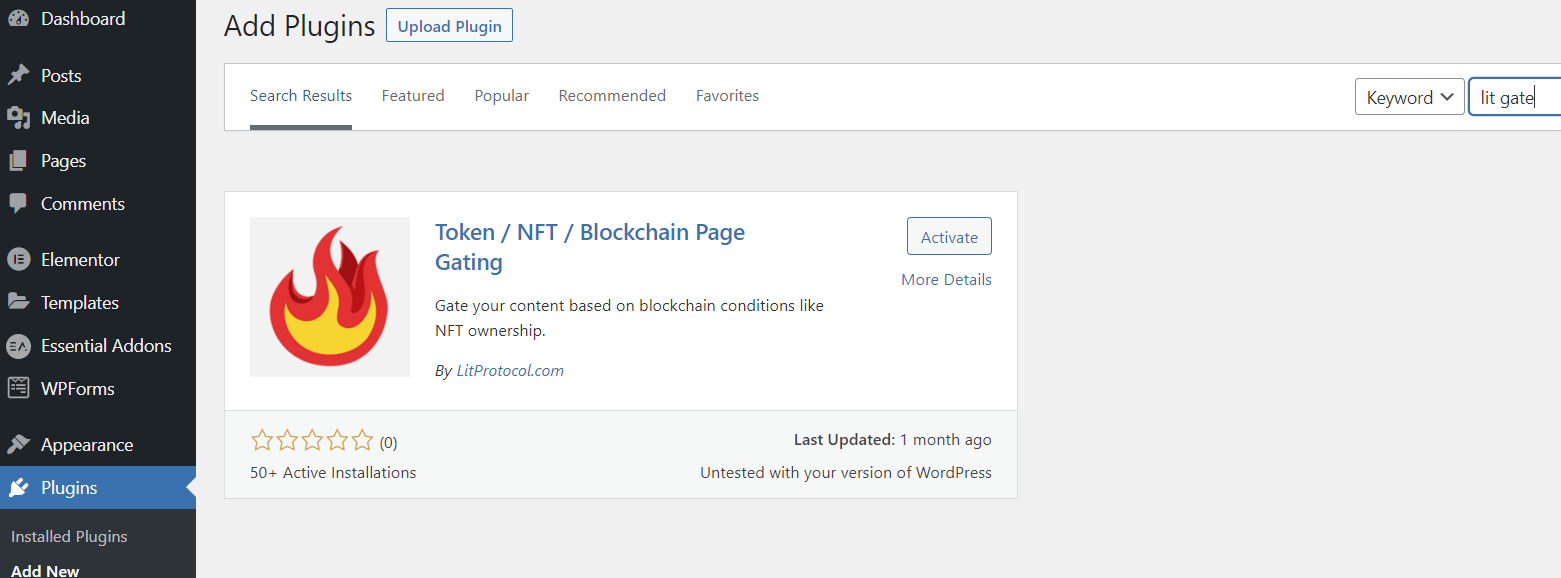
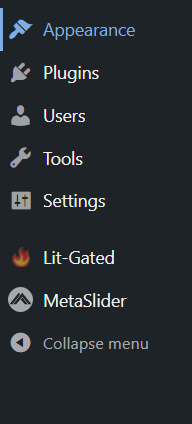
Once you have found the plugin, select install. And then select Activate. On activation, a new tab, Lit-Gated will appear on your dashboard. The magic happens here as this is where we add the access control conditions.
Content (page or post) that you want to gate.
This can be any page or post on your WordPress site. You will need to create this before we can apply conditions to it.
2. The contract address for the NFT that will be used to unlock the gated content.
have the contract address handy as you will need this to set the condition to unlock the content. You will also need the token numbers if you are using ERC1155 NFTs.
Setting Lit-gated Conditions
The Lit-gated WordPress plugin works by encrypting the content of the webpage or blogpost. The conditions which we set are the access control conditions that decrypt the content.

To set a condition, select Add Row
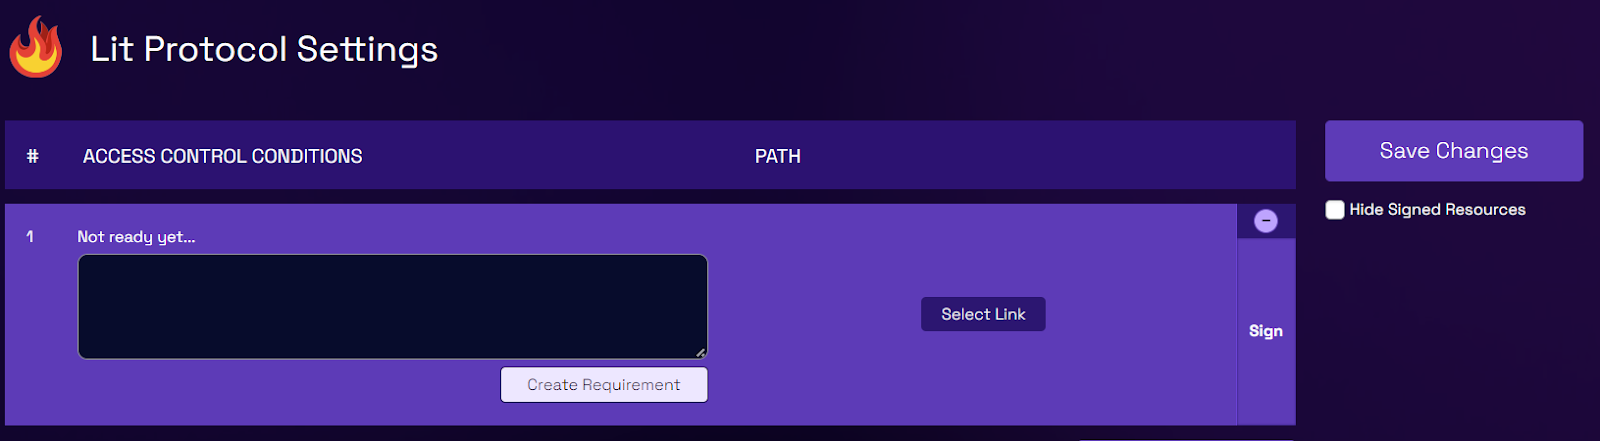
Then select Create Requirements. This will open the access control builder.
First select the blockchain that the NFT is minted on.

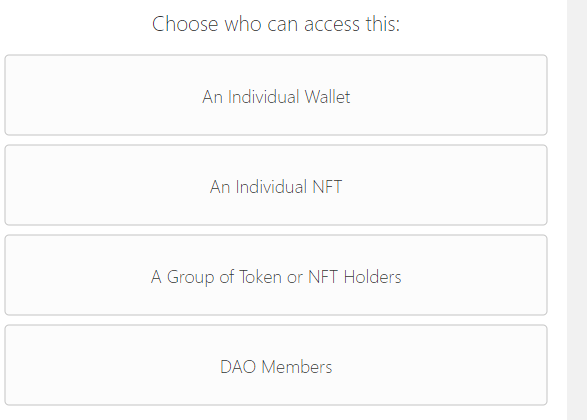
Next, choose who will have access to the content. In this example we are going to select a group of Token or NFT holders. However, as you can see you can also restrict access to a wallet holder, an individual NFT or a DAO membership.
In the first field, enter the contract address for the NFT. Next you need to select the correct token type, between ERC20, ERC721 and ERC1155. NFTs are either ERC721 or ERC1155. Then enter in the token ID. If you are allowing multiple token IDs, separate each one with a comma. Finally enter how many of the tokens the user needs to have.
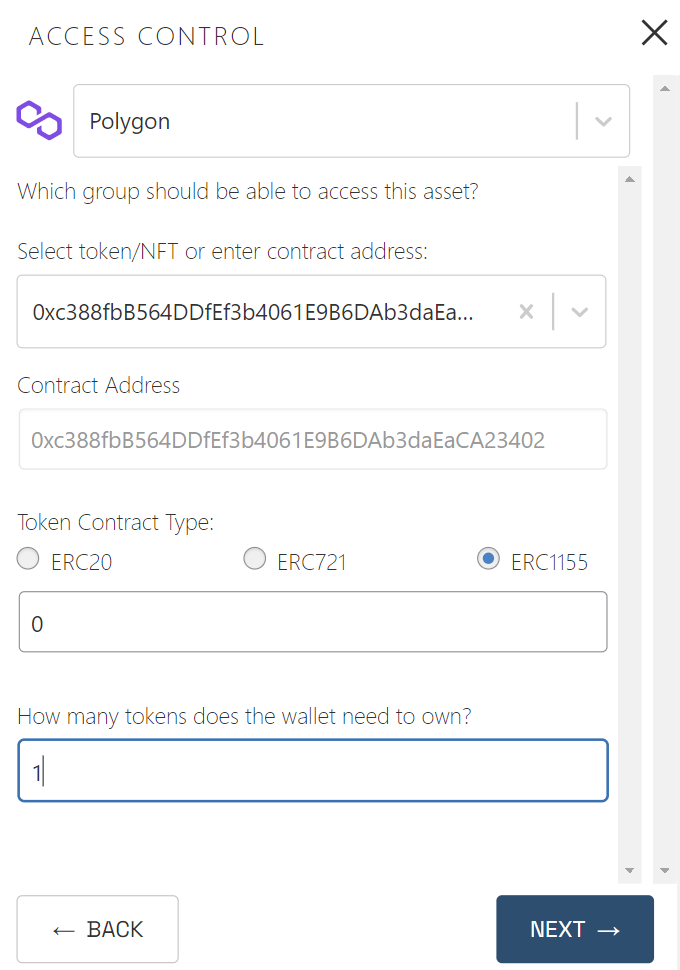
Once you select Next, you must review your conditions and select done.

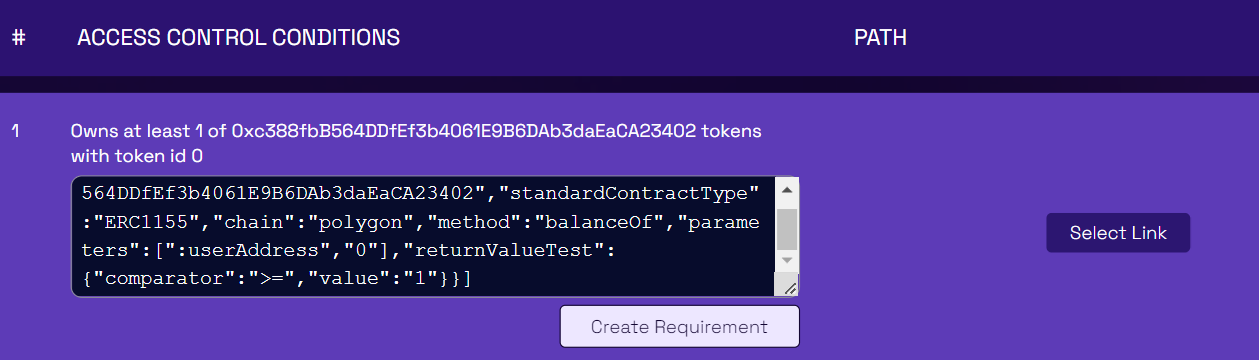
This will then populate the requirements field with the coded condition. For more information on creating conditions, Lit-gated has some great examples in their documentation. Basic Examples | Lit Protocol Developer Docs.
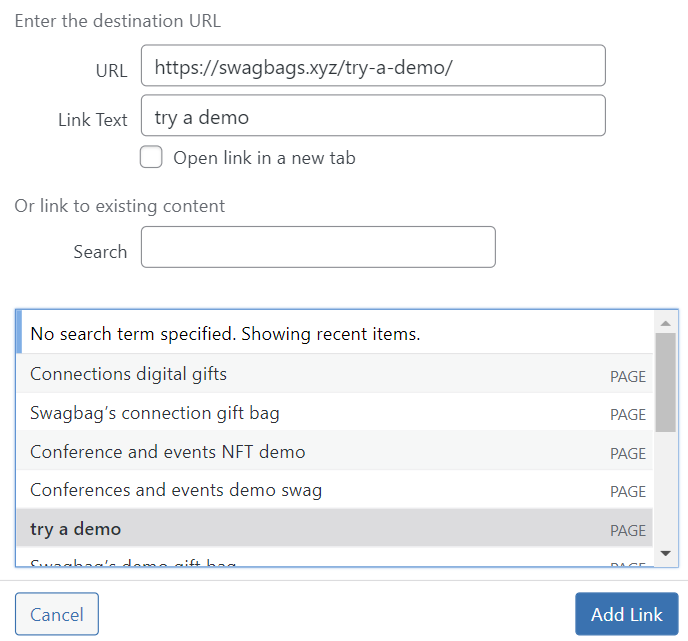
The next step is to Select Link. This is the page or blog post that you want to lock and apply the conditions too. Once you press Select Link, a new window will open for you to pick your content.
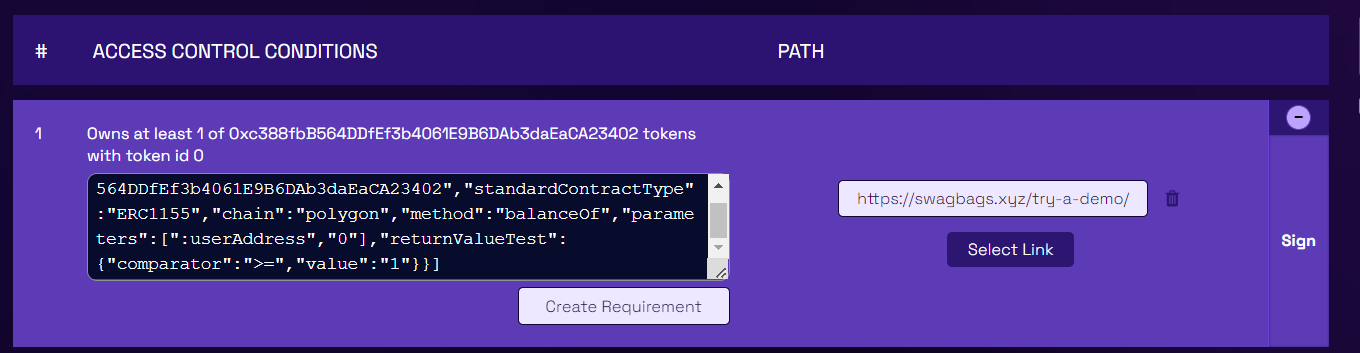
One the link has been added, the final step is to Sign the transaction. This transaction, at the time of writing, has no fees attached.

You will know if a condition is active as you will see Click to edit. But be warned, if you do click to edit, then the condition is no longer active, and you must sign the transaction again.

Now when you visit the page you added the conditions too, it will be locked, and only those that satisfy the conditions will be able to unlock the page.
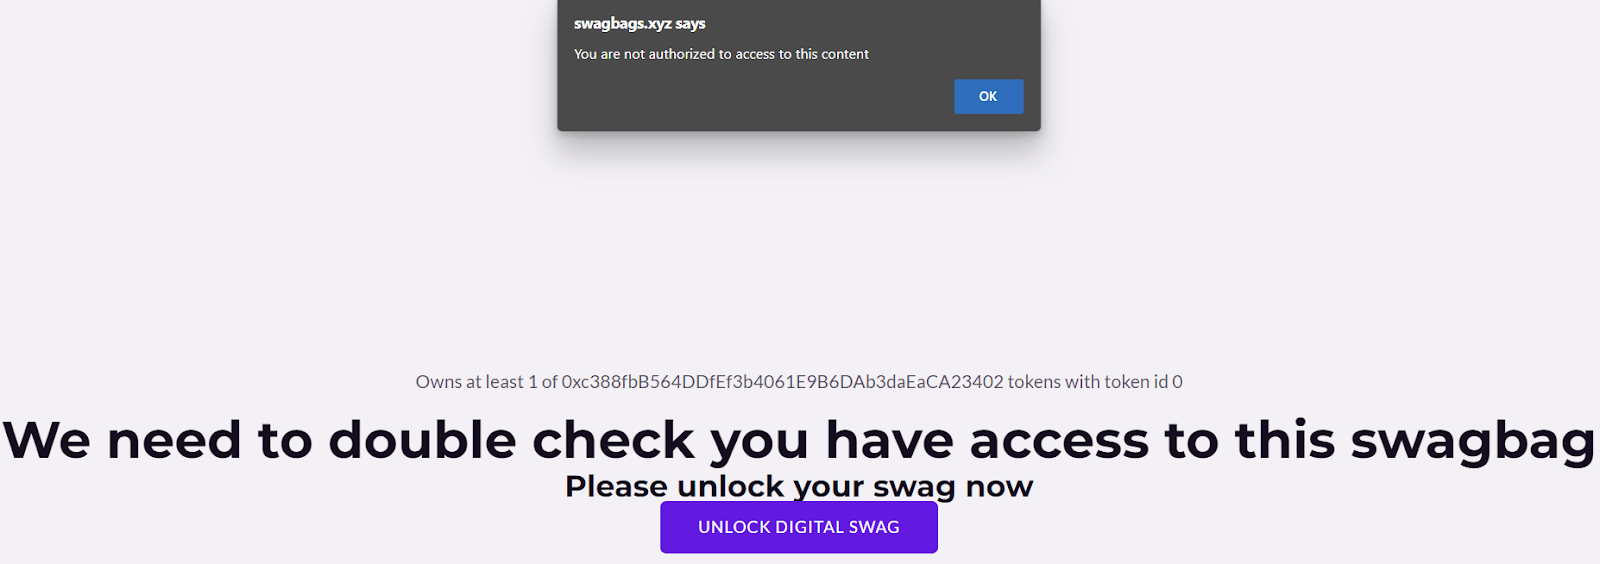
Editing how the unlock screen looks
You may notice that the image of the unlock page we have shared is somewhat different to what you see when you use the plugin. We took some time to edit how the lock screen looks. To do this, you need to know a little HTML and we will have to edit the source code of the plug in. Go to Plugins and then select Plugin File Editor.

When the editor opens, we must select the correct plugin from the drop down and then make sure to press select.
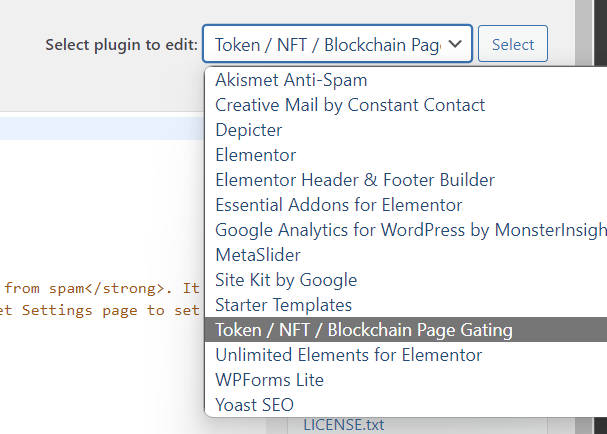
Once you press select, the files and code for the plugin are shown. Under Plugin Files, select the file wp-lit-gated-php

In the code, if you scroll down to row 267 BEFORE POST REQUEST, the rows of code within this heading are the rows that need to be changed to edit how the page is shown to others. Here is the code we have used; you can use this to compare to the code supplied with the plugin.
// ==================================================================================
    // +                              BEFORE POST REQUEST                               +
    // ==================================================================================
    if(empty($_POST) && $found_entry != null){
        if( ! $found_entry->signed){
            echo '<b>This page is not signed yet. You will not be able to unlock this page even if you\'ve met the requirements.</b>';
        }
        echo '
            <div class="lit-gated">
                <section>
                <div id="lit-msg"></div>
                <H1> We need to double check you have access to this swagbag</H1>
                    <H3> Please unlock your swag now </H3>
                    <h2>  </h2>
                    <form action="'.htmlspecialchars(lwlgf_request_headers()->url).'" method="POST" id="lit-form">
                        <input type="hidden" id="jwt" name="jwt" value="">
                        <input type="submit" id="lit-submit" value="Unlock Digital Swag">
                    </form>
</section>
            </div>
        ';
}else{
Conclusion
Lit-gated plugin is handy for sure, and for the non-developers out there trying to build in the web3 world, it is a protocol you should learn more about. I did however find it a little bit buggy. For example, when you add the plugin and have no conditions set, for some reason the pages on my website were showing twice. Also, when you try to edit a page that has a condition set, but not signed, Elementor opens in safe mode. So there does seem to be a compatibility issue with Elementor. I also found that the gasless minting does not work if the lit-gated plugin is active. But I am sure not too many will be trying that.
Will I use the Lit-gated plugin? Yes, yes, and yes again. Despite being a little buggy, the concept of the protocol is amazing. We have spoken with the team on these bugs, and we will update this post when they are resolved. Its early days with the team and the project is open source, so anyone can contribute and help fix these bugs. We are currently testing the implementation of Lit gate in two projects. So, it’s a big yes from us.
FREE TRAINING - ONBOARDING 25k PEOPLE TO WEB3
Udemy – Explore the course now - Navigating and Using Web3 – Blockchain for everyday users
Skillshare – Explore the course now - Navigating and Using Web3 – Blockchain for everyday users
Subscribe to our Cryptocurrency, Web3, Blockchain and Digital Assets Newsletter
I have read and agree to the terms & conditions.